Client Portal
Once clients have been entered, they can then be given access to a client portal - a miniaturized version of the system where they can:
- Update their own details
- View events which they have already booked
- View the name and contact number of the team leader whom has been assigned to the event
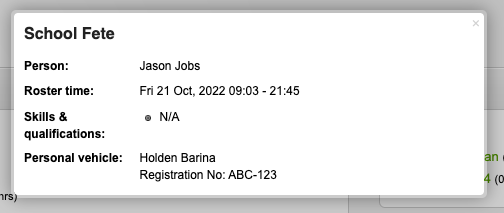
- View the roster of people assigned to the event (configurable)
- Show names, photo ID (particularly if security need to confirm any last minute additions), rostered times, specific skills & qualifications they need for the event (inc. downloadable certificates where relevant), and personal vehicle information (for instance, to arrange vehicle permits/passes where required)
- View the required-qualifications of people rostered (configurable)
- Show names, photo ID (particularly if security need to confirm any last minute additions), rostered times, specific skills & qualifications they need for the event (inc. downloadable certificates where relevant), and personal vehicle information (for instance, to arrange vehicle permits/passes where required)
- Upload documents, files, maps, photos, etc to events your clients have booked (configurable)
- Download documents your staff have uploaded to the event (configurable)
- View their past events
- Book new events in the system
- Specify staff and resource requirements
- Re-book previous events
Any change of details will be emailed to admin staff of the group the client has been assigned to, and an email is also sent when clients have entered new events into the system. These emails serve as a notification and do not require any manual data-entry or intervention to save the changes - this is done automatically for you.
The address clients should use to access the client portal is:
https://<your site url>/client-portal
From there client contacts will enter their email address and password into the login page and be able to create new events. New events are set to 'To be confirmed' by default.
If enabled, clients can enter the number of staff they would like at the event when booking new events. This can be enabled via the 'Configuration' page in the settings menu.
Setting up the Client Portal for the first time
There are few things which need to be setup when getting the client portal ready for the first time - follow the instructions here for more information.
Accounts for Client-Contacts
Client contacts each have their own username and password to the system.
Their email address will be their username, and their password needs to be set by editing each of the contacts details.
Eg. A client 'ACME Group' might have 3 contacts/staff which have been added (Mary, Jane, Steven). To setup a password for Mary, Jane & Steven, you will need to edit each of their details, and set an individual password.
Setup
Setup is done in two stages;
- Make sure the client has been setup with client portal access – this is done by editing the client details and clicking the 'Client Portal' button at the top right of the screen. Make sure you select 'Enabled' in 'account status', and select the default group & event types you'd like their events set to. There are a few other options you might also want to enable.
- Edit the contact info for the person you're wanting to give access to the client portal – make sure their status is set to "Active", and then either set a password for them, or click the "Generate and send a random password" tickbox.
- That's it!
They should get an email with their password and some brief instructions on how to login to the client portal. You might want to give your client a call as well to make sure they've received the email and were able to login.
The client portal is located at the following address:
https://<your site url>/client-portal